Table of Contents
ToggleSmall spaces demand smart solutions. The O’nin room divider with 8 storage bins tackles two common problems at once: defining separate zones in open-plan homes and adding much-needed storage without eating up floor space. This modular unit works equally well in studio apartments, shared bedrooms, home offices, and playrooms. Unlike traditional fixed walls or flimsy curtain dividers, this piece combines structural stability with functional storage, making it a practical choice for renters and homeowners alike who need flexibility without permanent modifications.
Key Takeaways
- The O’nin room divider with 8 storage bins solves two problems at once—defining separate zones and adding functional storage without permanent modifications, making it ideal for renters and small-space living.
- Assembly takes 30-45 minutes with basic tools, and the open-back design allows light and airflow while creating visual boundaries, with the option to secure the unit to walls for homes with children or pets.
- Strategic bin organization using category-based sorting and the 80% fill rule prevents clutter, while labeling and rotating seasonal items keeps your most-used storage accessible and functional.
- The divider works in multiple spaces—studio apartments, shared kids’ rooms, home offices, playrooms, and entryways—with each application offering flexible storage and space separation options.
- Pros include no permanent installation, dual functionality, affordability ($80-$150), and easy assembly, while cons involve limited sound dampening, dust attraction in fabric bins, and inability to store heavy items.
- With minimal maintenance—monthly vacuuming of bins and quarterly hardware checks—the O’nin room divider lasts 5-7 years, making it a practical investment for adaptable home organization.
What Makes the O’nin Room Divider Stand Out?
The O’nin room divider distinguishes itself through a combination of open-shelf design and integrated fabric storage bins. Most generic room dividers offer visual separation but little else. This unit delivers both privacy and organization in a single footprint.
Key Features and Design Elements
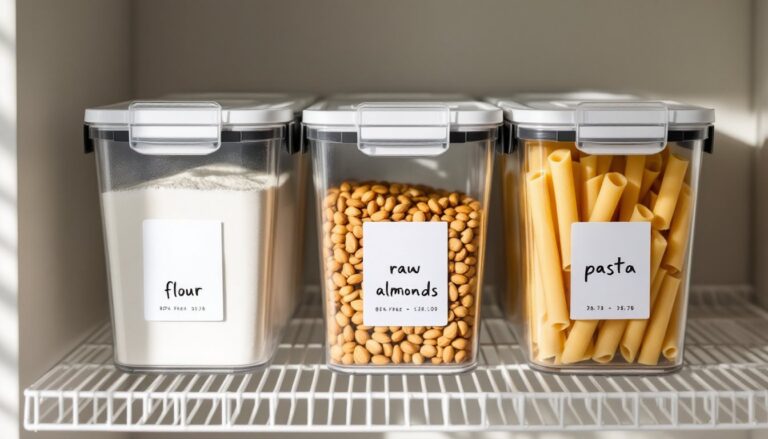
The frame typically measures 70-72 inches tall by 48-52 inches wide, constructed from engineered wood or powder-coated steel tubing depending on the model. The open-shelf design creates eight cubbies, each approximately 12 inches square, that accommodate the included fabric storage bins.
These bins are usually constructed from non-woven polypropylene or polyester fabric with cardboard reinforcement panels in the base and sides. This construction keeps them lightweight (around 8-12 ounces empty) while supporting 10-15 pounds of stored items per bin without sagging.
The divider’s open-back design allows light and airflow through the space while still creating visual boundaries. This matters in small rooms where a solid wall would make the area feel cramped. You can face the bins toward either side or mix orientations, three bins facing the bedroom, five toward the living area, for example.
Most O’nin units use a cross-base stabilizer or T-shaped foot design rather than wall anchoring, which makes them renter-friendly. That said, in homes with small children or pets, adding an L-bracket and toggle bolt to secure the top rear edge to a wall stud is worth the effort. The IRC doesn’t require it for non-fixed furniture, but tip-over accidents happen with freestanding tall units.
How to Set Up Your O’nin Room Divider
Assembly typically takes 30-45 minutes with basic tools. Most units ship flat-packed with cam-lock or bolt-together hardware.
Tools you’ll need:
- Phillips screwdriver or drill with Phillips bit
- Rubber mallet (optional, helps seat joints)
- Level
- Tape measure
- Safety glasses (particularly if drilling pilot holes for wall anchoring)
Step-by-step assembly:
-
Clear a workspace at least 6×6 feet. Lay out all panels, hardware, and bins. Count pieces against the instruction sheet before starting, missing a cam lock now saves frustration later.
-
Assemble the frame horizontally. Most designs use a ladder-style construction: two vertical side panels with horizontal shelves slotted between. Insert cam locks or bolts through pre-drilled holes, ensuring the finished side of each panel faces outward.
-
Tighten connections in stages. Finger-tight first, then go back and fully tighten once the entire frame is together. This prevents racking (when the frame twists out of square). Check diagonal measurements, corner to corner should be equal.
-
Stand the unit upright with help. Even lightweight models are awkward. Get a second person to steady it while you check plumb with a level on both the front edge and side.
-
Position and secure. Place the divider where you want it, leaving 2-3 inches of clearance from the wall if you’re not anchoring it (allows for baseboard irregularities and air circulation). If anchoring to the wall, locate studs with a stud finder and use appropriate hardware for your wall type, wood screws into studs or toggle bolts for drywall.
-
Insert the storage bins. Fold them according to instructions (usually involves popping the cardboard base panel into slots). Slide bins into cubbies with the open side facing your preferred direction.
Let the unit settle for 24 hours before loading it heavily. Engineered wood can shift slightly as the hardware fully seats.
Creative Ways to Use This Room Divider in Your Home
The O’nin divider adapts to multiple room configurations beyond basic space separation.
Studio apartment zoning: Position it perpendicular to the wall between your sleeping and living areas. Load the bedroom-facing bins with clothing, linens, or pajamas: use the living-side bins for books, remote controls, or throw blankets. This creates a psychological boundary without blocking HVAC vents or windows.
Shared kids’ rooms: Place the divider as a centerline between two beds, giving each child their own territory and storage. Designate four bins per child, one for toys, one for books, one for art supplies, one for seasonal clothing. This setup works particularly well in rooms with a single closet.
Home office backdrop: Position the unit behind your desk chair as a Zoom background. The bins conceal office clutter while the open shelves display a few tasteful items (a small plant, a framed credential, neutral books). This beats staring at a blank wall during video calls and provides easy-access storage for frequently used supplies.
Playroom organizer: Use all eight bins for toy categorization, blocks in one, stuffed animals in another, art supplies in a third. The open design lets kids see their options without dumping every bin. Position it to separate the active play zone from a quieter reading corner.
Entryway catch-all: In open-plan homes lacking a defined foyer, place the divider perpendicular to the front door to create an entry zone. Store shoes, bags, pet leashes, and outgoing mail in the bins. This gives guests a visual cue to remove shoes and prevents the “drop zone” from spreading into the living area.
Most woodworking project enthusiasts appreciate modular furniture that doesn’t require cutting or advanced joinery, making units like this accessible for first-time builders looking to add custom storage.
Organizing with the 8 Storage Bins: Tips and Ideas
Eight bins might seem like plenty until you start filling them. Strategic categorization prevents the “junk drawer effect” where everything becomes a jumbled mess.
Category-based sorting works better than room-based. Instead of “bedroom stuff” in one bin, try “electronics and chargers,” “spare linens,” “seasonal accessories,” and “hobby materials.” This system stays coherent even when you relocate the divider.
Use the 80% rule: Fill bins only 80% full. Overstuffed fabric bins lose their shape, making it harder to slide them in and out of cubbies. If a bin is bursting, either purge items or redistribute across two bins.
Label the front edge of each bin with a label maker or adhesive chalkboard labels. Even if you think you’ll remember what’s where, labels save time during rushed mornings and help other household members return items to the right spot.
Rotate seasonal items through the bins rather than storing them elsewhere. In October, swap the sunscreen and beach toys bin for winter hats and gloves. This keeps your most-used items accessible without requiring a separate seasonal storage system.
Nest smaller containers inside the bins for small items like craft supplies, hardware, or kids’ toy accessories. Small plastic bins (dollar store finds work fine) or zippered mesh pouches prevent small items from becoming a loose pile at the bottom.
The beauty of multifunctional storage solutions lies in their adaptability, what holds toys today can store craft supplies next year without requiring new furniture.
Assign bins by frequency of use: Place daily-access items (current books, frequently worn accessories, active toys) in the lower and middle cubbies. Occasional-use items (holiday decorations, off-season clothing, archive files) can occupy the top row, which requires a step stool to reach comfortably.
Color-code for shared spaces. If multiple people share the divider, assign each person a bin color or pattern. This works especially well with kids who can’t read labels yet but can identify “my red bin.”
Pros and Cons: Is the O’nin Room Divider Right for You?
Like any furniture piece, this divider has specific strengths and limitations.
Pros:
- No permanent modification required. Perfect for renters or anyone avoiding drywall work. You can relocate it whenever your needs change.
- Dual functionality. Space division plus 80-120 pounds of storage capacity (assuming 10-15 pounds per bin) in one footprint.
- Visual lightness. The open design doesn’t create the cave-like feeling that solid dividers or curtains can produce in small rooms.
- Budget-friendly. Most models retail between $80-$150, significantly less than custom built-ins or contractor-installed half walls.
- Accessible assembly. No miter saw, pocket screws, or dado joints required. If you can use a screwdriver, you can build this.
Cons:
- Limited sound dampening. The open design does nothing to block noise between zones. If you need actual acoustic privacy, this won’t deliver it.
- Fabric bins attract dust. Unlike closed drawers, the open weave of fabric bins collects airborne particles. Plan on vacuuming them monthly or more often in dusty environments.
- Not suitable for heavy items. Each shelf typically maxes out at 15-20 pounds. Don’t use this for storing power tools, large books, or anything approaching the weight of traditional storage cubes designed for heavier loads.
- Stability concerns with active households. Without wall anchoring, the unit can tip if climbed or pulled. Homes with toddlers or large pets should absolutely anchor it.
- Engineered wood limitations. Most budget models use particleboard or MDF, which doesn’t tolerate moisture well. Avoid placing this divider in basements prone to dampness or near humidifiers.
This divider suits temporary space division and light-duty storage. It’s not a replacement for structural walls, soundproofing solutions, or heavy-duty shelving systems.
Styling and Maintenance Tips
A room divider sits at eye level in the middle of a space, making it a focal point whether you intend it or not. Thoughtful styling prevents it from looking like institutional furniture.
Mix storage with display. Don’t fill all eight cubbies with bins. Leave 2-3 open to display a small plant, a stack of attractive books, or a decorative basket. This breaks up the grid and adds visual interest. Experts at Real Simple often recommend the 60/40 rule for open shelving, 60% functional storage, 40% decorative display.
Coordinate bin colors with your room palette. Most O’nin sets offer bins in neutral colors (gray, beige, white, black). Choose a shade that either blends with your walls for a subtle look or contrasts for definition. Avoid busy patterns unless your room is otherwise very neutral.
Add texture on top. The flat top surface (usually 12-15 inches deep) can support trailing plants, a table lamp, or a low tray with decorative objects. Keep items under 10 pounds and avoid placing anything that could be easily knocked off by passing foot traffic.
Maintenance is minimal but necessary:
- Vacuum fabric bins monthly using an upholstery attachment. For deeper cleaning, most bins can be spot-cleaned with a damp cloth and mild detergent. Remove the cardboard insert first and allow the fabric to dry completely before reassembling.
- Dust the shelves every 2-3 weeks with a microfiber cloth. Engineered wood surfaces clean easily with a barely-damp cloth, never use spray cleaners that can seep into seams and cause swelling.
- Check hardware quarterly. Cam locks and bolts can loosen over time, especially if the divider is moved frequently. Tighten any that have backed out to prevent wobbling.
- Inspect for damage after moves. If you relocate the unit, check corners and edges for chips or splitting. Touch up minor damage with a furniture marker in a matching color.
With basic care, these dividers easily last 5-7 years in normal household use. They won’t become heirlooms, but they’ll serve you well through multiple room reconfigurations and life changes.