Table of Contents
ToggleA cluttered workshop isn’t just frustrating, it’s dangerous. Tripping over extension cords, hunting for the right drill bit while a project sits half-finished, or worse, finding your cordless impact driver buried under a pile of sawdust wastes time and risks tool damage. Power tools represent a significant investment, and proper storage extends their lifespan while keeping a workspace safer and more efficient. Whether working in a spacious garage or a compact corner of the basement, smart storage solutions turn chaos into a functional command center where every tool has a home and every project starts with everything within arm’s reach.
Key Takeaways
- Proper DIY power tool storage prevents dust damage, improves safety, extends tool lifespan, and dramatically increases workflow efficiency in any workshop.
- Wall-mounted pegboard systems are an affordable and flexible storage solution ($15–25 per sheet) that work best for frequently used tools at chest height when paired with quality locking hooks.
- A custom tool cabinet with adjustable shelving and dedicated compartments offers superior dust protection and security while allowing you to tailor storage to your specific tool collection.
- Rolling tool carts built from 2×4 lumber and rated casters provide mobile storage solutions ideal for job sites or workshops that serve multiple purposes.
- French cleat systems and overhead racks handle heavy-duty tools and seasonal equipment, with French cleats supporting 50+ pounds per linear foot and ceiling mounts reclaiming valuable floor space.
- Effective DIY power tool storage combines multiple approaches—pegboard for hand tools, French cleats for heavy equipment, and custom solutions for accessories—tailored to your workspace and project needs.
Why Proper Power Tool Storage Matters
Beyond the obvious benefit of knowing where to find a circular saw at 6 a.m. on a Saturday, organized tool storage prevents real problems. Dust and moisture are the enemies of power tools, exposed motors, switches, and battery contacts degrade faster when left on open shelves or tossed in damp corners.
Safety is non-negotiable. Tools stored haphazardly create trip hazards, and unsecured equipment can fall, causing injury or damage. Blades, bits, and sharp edges need dedicated spaces away from general traffic areas, especially in homes with children.
Tool longevity improves dramatically with proper storage. Batteries last longer when stored at room temperature in their cases, not left on chargers indefinitely. Calibration holds better on tools hung vertically or stored flat rather than tossed in drawers where they bang against each other.
Workflow efficiency matters too. A well-organized system means spending minutes on a project instead of hours searching. When tackling garage storage projects, power tool organization should be the foundation, everything else follows.
Wall-Mounted Pegboard Systems for Flexible Tool Organization
Pegboard remains a workshop staple for good reason: it’s cheap, adaptable, and dead simple to install. ¼-inch tempered hardboard pegboard is the standard, sold in 4×8-foot sheets at any home center for $15–25. Metal pegboard costs more but won’t sag under heavy tools.
Installation requires furring strips or spacers behind the board to create clearance for hooks. Mount 1×2 furring strips horizontally across wall studs every 16 inches, then screw the pegboard into the strips using #8 wood screws every 12 inches. Without that air gap, hooks won’t seat properly.
Hook selection makes or breaks pegboard systems. Cheap wire hooks slip out under weight. Spend the extra few bucks on locking pegboard hooks or rubberized versions that grip better. For cordless drills and impact drivers, use pegboard tool holders with cradles that support the body, not just hang by the handle.
Layout strategy: Keep frequently used tools at chest height. Heavier tools like reciprocating saws go lower to reduce strain. Label outlines with a paint marker so tools return to the same spot, visual cues keep systems working long-term.
One limitation: pegboard doesn’t handle extremely heavy tools well. A 12-pound corded grinder will work loose over time. For those, consider French cleats.
Build a Custom Tool Cabinet With Dedicated Compartments
A cabinet beats open storage for dust protection and security. Building one from scratch allows custom sizing for specific tools, no wasted space, no forcing a circular saw into a too-small shelf.
Materials: ¾-inch plywood forms the cabinet box: ½-inch plywood or MDF works for shelves and dividers. A 4×8 sheet of birch plywood ($60–80) builds a decent-sized cabinet with material left over. Skip cheap pine, it racks and warps.
Construction basics:
- Cut side panels to desired height (48–72 inches typical). Width depends on wall space, but 24–36 inches is manageable.
- Assemble the box using pocket screws or dado joints. Dados add strength but require a router or table saw with a dado stack.
- Add a face frame from 1×2 pine for rigidity and a finished look. Attach with glue and brad nails.
- Install adjustable shelving using shelf pin holes drilled every 2 inches. A pegboard jig ensures straight lines.
- Dividers inside keep batteries, chargers, and accessories separated. Cut them from ½-inch material and dado or screw into place.
- Doors are optional but recommended for dust control. Use Euro hinges for a clean, modern look or traditional butt hinges for simplicity.
Finishing: Two coats of polyurethane protect against oil and grime. For workshops without climate control, seal all sides including backs to prevent moisture absorption.
Many detailed cabinet building plans walk through joinery techniques and door-hanging tricks for first-time builders.
Ventilation matters: Don’t seal battery-powered tools in airtight cabinets, especially lithium-ion batteries. Drill a few ½-inch ventilation holes in the back panel.
Rolling Tool Cart Solutions for Maximum Mobility
Mobility wins when a workshop serves double duty as a parking space or when hauling tools between the shop and a job site. A rolling cart keeps everything together and moves where needed.
Pre-built vs. DIY: Ready-made mechanic’s tool carts ($150–400) offer drawers and organization but aren’t sized for bulky power tools. Building a custom cart tailors storage to specific needs.
DIY cart construction:
- Base frame: Use 2×4 lumber to build a sturdy rectangle. For a 24×36-inch cart, cut two 36-inch pieces and two 21-inch pieces (accounting for 1.5-inch actual width of 2×4s). Join with 3-inch deck screws.
- Caster selection: This makes or breaks mobility. Use 4-inch swivel casters rated for at least 100 pounds each. Two should lock. Mount with ¼-inch lag bolts into pre-drilled holes.
- Shelving: ¾-inch plywood shelves span the frame. Two or three levels accommodate different tool heights. Screw through supports into shelf edges.
- Drawer boxes (optional): Build simple boxes from ½-inch plywood using glue and brad nails. Mount on side-mount drawer slides rated for 75+ pounds.
- Top surface: A ¾-inch plywood top provides a work surface. Edge it with ¾×¾-inch hardwood to prevent chipping.
Power strip integration: Mount a surge-protecting power strip on one side for charging batteries on the cart itself. Use cable clips to manage cords.
Storage layout: Reserve the top shelf for active project tools. Lower shelves hold backup equipment. Drawers work well for accessories, bits, and blades.
For projects requiring frequent moves, like home renovation work, a cart eliminates repeated trips to a fixed storage location.
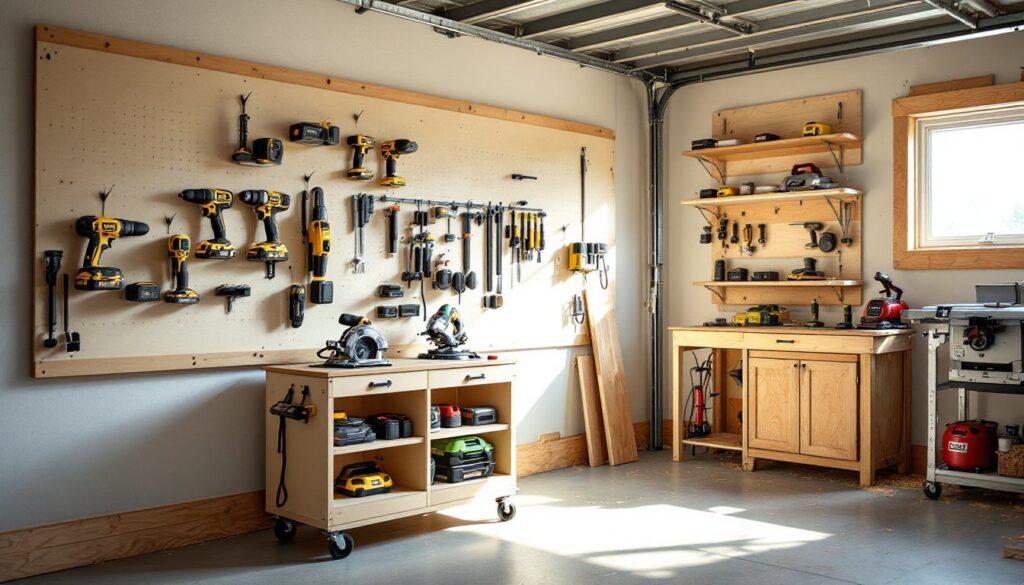
French Cleat Storage Walls for Heavy-Duty Tools
French cleats handle weight that would tear pegboard off the wall. The system uses two 45-degree beveled strips, one mounted to the wall, one attached to the tool holder, that interlock to create a secure, reconfigurable system.
Material: ¾-inch plywood ripped into 3-inch strips works perfectly. A table saw with the blade tilted to 45 degrees cuts the bevels. For an 8-foot wall, rip at least four 8-foot cleats.
Installation:
- Locate studs and mark them. French cleats must hit studs every 16–24 inches, drywall anchors won’t cut it.
- Mount wall cleats horizontally with the bevel angled up and out. Use 3-inch wood screws into each stud. Level is critical: use a 4-foot level.
- Space multiple rows 12–16 inches apart vertically for maximum flexibility.
Tool holders:
- Cordless drill cradles: Screw a U-shaped block to a cleat piece. Size the U to fit drill bodies snugly.
- Circular saw brackets: A simple L-bracket holds the saw vertically by its base plate.
- Battery charging stations: Mount a small shelf with a cleat on back, add a power strip, and park chargers there.
- Nail gun hangers: A vertical dowel through a cleat piece creates a peg for nailers.
Advantages: Weight capacity exceeds pegboard by a wide margin, properly installed cleats hold 50+ pounds per linear foot. Reconfiguration takes seconds: just lift and move holders.
Drawback: Fabricating custom holders takes more time than buying pegboard hooks. For complex designs, numerous project tutorials offer templates and cut lists.
Pro tip: Paint wall cleats a contrasting color so it’s obvious where to hang tool cleats.
Overhead Storage Racks to Reclaim Floor Space
Overhead racks excel for seasonal tools or equipment used infrequently. A ceiling-mounted storage rack keeps miter saws, portable table saws, and air compressors off the floor without sacrificing wall space needed for active storage.
Load capacity and safety: Garage ceilings typically frame with 2×4 or 2×6 joists on 16-inch or 24-inch centers. A single joist supports significant weight, but lateral force from hanging heavy objects can stress the connection. Always span at least two joists and use ¼-inch lag bolts or structural screws rated for overhead loads.
Pre-built systems like adjustable steel racks ($80–200) mount directly to joists and lower via pulley systems. These work well but limit customization.
DIY overhead platform:
- Frame: Build a 2×4 frame sized to fit between joists (14.5 inches wide for 16-inch on-center framing). Make it as long as needed, typically 48–96 inches.
- Mounting: Attach the frame perpendicular to joists using 3.5-inch structural screws or ⅜-inch lag bolts. Pre-drill to avoid splitting.
- Decking: ¾-inch plywood or 2×4s laid flat create the platform surface. Screw through decking into the frame.
- Access: Install in areas reachable by stepladder. Mark stored items clearly so retrieval doesn’t require moving everything.
Height considerations: Maintain at least 6.5 feet of clearance below the rack for comfortable movement. If the garage also parks vehicles, ensure car roofs clear stored items.
Weight distribution: Spread heavy tools across the platform rather than concentrating weight in one spot. A loaded platform might hold 200+ pounds, but joists flex under point loads.
This approach mirrors principles used for overhead gym storage, where bulky equipment needs accessible but out-of-the-way homes.
Weatherproofing: In unconditioned spaces, avoid storing tools with batteries overhead during temperature extremes. Electronics fare poorly in heat or freezing.
Conclusion
Effective power tool storage isn’t about buying the fanciest system, it’s about matching solutions to specific needs. Wall-mounted pegboard offers flexibility, cabinets provide dust protection, carts bring mobility, French cleats handle heavy loads, and overhead racks reclaim floor space. Most workshops benefit from combining several approaches: pegboard for hand tools, French cleats for heavy power tools, and clear storage containers for accessories. Start with the tools used most often, build storage that makes sense for the space, and adjust as projects evolve. A well-organized shop doesn’t happen overnight, but every improvement makes the next project smoother.