Table of Contents
ToggleA bedroom that looks great but lacks storage leaves clothes piled on chairs and extra linens stuffed into closets already bursting at the seams. A foot of bed storage bench solves that problem while adding visual weight to anchor the bed and complete the room’s layout. It’s not just decorative furniture, it’s a practical workhorse that hides blankets, off-season clothing, shoes, and everything else that doesn’t have a home. Whether someone’s working with a cramped master or a guest room that doubles as storage overflow, the right bench transforms wasted floor space into organized, accessible storage without requiring a full closet renovation.
Key Takeaways
- A foot of bed storage bench solves bedroom clutter by providing accessible storage for blankets, seasonal clothing, and linens while visually anchoring the bed and balancing room proportions.
- The ideal foot of bed storage bench should span two-thirds to three-quarters of your bed’s width, sit 16–20 inches high, and maintain 24–30 inches of clearance from the mattress for comfortable walkthrough and bed-making access.
- Choose from upholstered benches for comfort and soft-close hinges, wooden farmhouse styles with drawer systems or open cubbies, or DIY options that cost $75–$150 and take a weekend to build.
- Storage benches work for multiple uses beyond blankets: seasonal clothing rotation, guest room essentials, children’s toy containment, fitness equipment, shoes, and accessories—making them a versatile solution for small bedrooms.
- A well-constructed foot of bed storage bench with solid wood frames and proper hinges will support 250–300 pounds daily and last significantly longer than particleboard alternatives, offering better value than retail models starting at $150.
Why Every Bedroom Needs a Storage Bench at the Foot of the Bed
Bedrooms rarely come with enough built-in storage, especially in older homes or apartments where closets measure barely four feet wide. A storage bench at the foot of the bed capitalizes on otherwise-unused floor space, that awkward gap between the bed and the wall or doorway.
From a design perspective, a bench visually grounds a bed, particularly in rooms with high ceilings or minimal furniture. It creates a horizontal line that balances tall headboards and prevents the bed from looking like it’s floating in the middle of the room.
Functionally, it’s a staging area. Homeowners can sit to put on shoes, fold laundry, or lay out tomorrow’s outfit without perching on the edge of the mattress. The hidden compartment, whether a lift-top, drawer system, or open cubby, keeps seasonal bedding, extra pillows, or clothing rotation accessible but out of sight.
For small bedrooms, this piece does double duty without requiring additional square footage. Instead of adding a separate dresser or linen chest, the bench consolidates storage into furniture that’s already part of the layout. That efficiency matters in condos, tiny homes, or children’s rooms where every piece needs to justify its footprint.
Types of Foot of Bed Storage Benches to Match Your Style
Upholstered Storage Benches
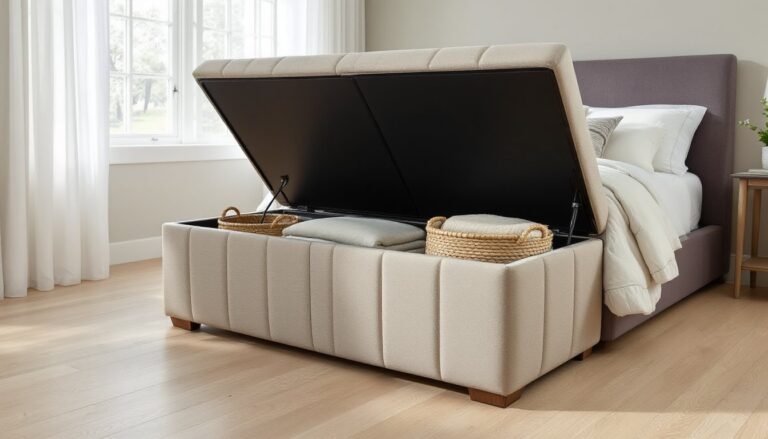
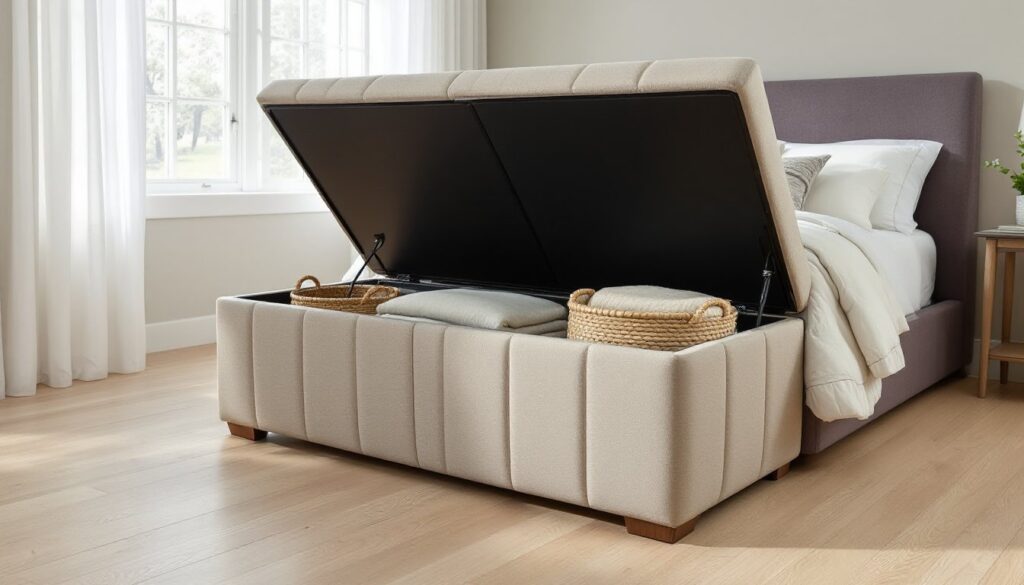
Upholstered benches bring softness and comfort, making them ideal for bedrooms where the bench will see regular use as seating. The padded top provides a cushioned surface for sitting while getting dressed or tying shoes, no one wants to sit on bare wood first thing in the morning.
Most upholstered models feature lift-top storage, where the entire seat lifts on hinges to reveal a single large compartment. This design works well for bulky items like comforters, throw blankets, or out-of-season clothing. Look for benches with gas lift mechanisms or soft-close hinges: they prevent the lid from slamming and make one-handed operation possible when arms are full of laundry.
Fabric choices range from performance linen (stain-resistant and durable) to velvet (luxe but higher-maintenance). Leather or faux leather wipes clean easily, which matters in homes with pets or kids. Tufted designs add traditional elegance, while clean-lined, channel-stitched styles suit modern or mid-century interiors.
Frame construction matters. Solid wood frames outlast particleboard or MDF, especially if the bench will support an adult’s weight daily. Check the weight capacity, quality benches support 250–300 pounds on the seat.
Wooden and Farmhouse-Style Benches
Wooden benches lean rustic or traditional, depending on finish and hardware. Farmhouse styles often feature plank-top construction, X-brace sides, and distressed paint or natural wood tones. They pair well with shiplap walls, metal bed frames, or vintage quilts.
Storage configurations vary more in wooden designs. Some use drawer systems, two or three drawers on metal glides, which keep contents organized and prevent items from shifting. Others incorporate open cubbies, great for bins or baskets that add texture while keeping small items corralled. Lift-top wooden benches mimic trunk designs, often with decorative hinges or metal corners for a vintage trunk aesthetic.
Solid wood (oak, pine, maple) handles daily wear better than veneer over engineered wood, though it costs more. Pay attention to actual vs. nominal dimensions if building or customizing: a bench made from 1×12 boards actually measures 3/4″ x 11.25″, affecting final interior storage depth.
Finish options include stain (shows wood grain), paint (hides imperfections and updates easily), or clear coat over raw wood. In bedrooms with high humidity, think coastal homes or above bathrooms, sealed finishes prevent warping. Many DIYers adapt plans from woodworking communities like Ana White to match specific room dimensions or style preferences.
How to Choose the Right Size and Height for Your Bed
Measure the bed frame and available floor space before shopping. A bench that’s too wide overwhelms a full or twin bed, while one that’s too narrow under a king looks like an afterthought.
Width: The bench should span two-thirds to three-quarters of the bed’s width. For a queen (60″ wide), aim for a bench between 40″ and 50″ wide. For a king (76″ wide), look for 50″ to 60″. This proportion feels intentional without blocking walkways on either side.
Depth: Standard benches measure 14″ to 18″ deep (front to back). Deeper benches offer more storage but require more clearance from the bed. Leave at least 24″ to 30″ between the foot of the mattress and the bench to allow someone to walk through or make the bed comfortably. In tight quarters, a shallower bench (12″ to 14″) still provides storage without crowding.
Height: Bench seat height typically ranges from 16″ to 20″, roughly the same height as a dining chair. This makes it comfortable for sitting to put on shoes. For aesthetic balance, the bench should sit lower than the top of the mattress, usually several inches below. If the mattress sits 24″ high (including box spring and frame), an 18″ bench looks proportional.
If the bedroom has a footboard, the bench needs to clear it. Measure from floor to the top of the footboard and choose a bench at least 2″ to 3″ shorter to avoid visual collision.
Test clearance before buying. Use painter’s tape on the floor to mark the bench’s footprint, then walk through the space for a few days to confirm it won’t create a tripping hazard or block access to outlets, windows, or closet doors.
Creative Ways to Use Your Foot of Bed Storage Bench
Beyond the obvious blanket storage, a foot of bed bench adapts to how a household actually lives.
Seasonal clothing rotation: Store winter sweaters or summer shorts inside, swapping contents twice a year. This keeps closets focused on current-season items and reduces visual clutter.
Guest room overflow: In a guest bedroom, stock the bench with extra pillows, a spare blanket, toiletries, and fresh towels. Guests can access necessities without rummaging through unfamiliar closets, and hosts avoid that last-minute scramble when someone stays over.
Kids’ room toy containment: In a child’s bedroom, the bench corrals stuffed animals, sports equipment, or art supplies. Bins inside the storage compartment keep small items from becoming a jumbled mess. A bench with a cushioned top doubles as reading nook seating.
Bedroom workout gear: Yoga mats, resistance bands, dumbbells, and foam rollers fit neatly inside, keeping fitness equipment out of sight but easy to grab. No more gym bag living in the corner.
Out-of-season bedding: Lightweight summer quilts, flannel sheet sets, or holiday-themed duvet covers stay clean and compressed until needed. Vacuum storage bags fit inside most benches and maximize cubic footage.
Shoes and accessories: For bedrooms without walk-in closets, the bench becomes shoe storage, especially for bulky boots or seasonal footwear. Add small bins for scarves, belts, or bags.
Homeowners with full size storage bed frames often pair them with benches to create a complete bedroom storage system, maximizing every inch of available space.
DIY Foot of Bed Storage Bench: Build Your Own in a Weekend
Building a basic storage bench requires intermediate carpentry skills but no specialized tools beyond a circular saw or miter saw, drill, and sander. Budget $75–$150 for materials, depending on wood choice and hardware.
Materials list:
- (2) 1×12 boards at 48″ long (sides)
- (2) 1×12 boards at 14.5″ long (front and back)
- (1) sheet of 1/2″ plywood, cut to 16″ x 48″ (bottom)
- (1) sheet of 3/4″ plywood, cut to 16″ x 48″ (lid/seat)
- (4) 2×2 boards at 10″ long (interior corner braces)
- Wood glue
- 1.25″ finishing nails or brad nails
- 2″ wood screws
- (2) lid hinges (piano hinge or heavy-duty butt hinges)
- Sandpaper (80, 120, 220 grit)
- Primer and paint or stain
- Optional: 2″ foam cushion and fabric for upholstered top
Tools needed:
- Circular saw or miter saw
- Drill with bits and countersink
- Tape measure
- Speed square
- Orbital sander or sanding block
- Clamps
- Safety glasses and dust mask
Step-by-step build:
-
Cut all pieces to size. Double-check measurements, remember that 1×12 boards actually measure 11.25″ wide. A miter saw gives cleaner cuts than a circular saw, but either works with a steady hand and a clamped straightedge guide.
-
Assemble the box frame. Apply wood glue to the edges where the front, back, and side pieces meet. Use 1.25″ finishing nails or a brad nailer to secure joints. Clamp corners while fastening to keep everything square. Check with a speed square before glue sets.
-
Attach the bottom. Flip the frame upside down. Apply glue to the bottom edges and set the 1/2″ plywood bottom in place. Secure with finishing nails every 6″ around the perimeter. This adds rigidity and keeps stored items from falling through.
-
Install corner braces. Screw the 2×2 corner braces inside each corner, flush with the top edge. These reinforce the frame and provide a solid anchor point for the lid hinges. Use 2″ wood screws driven through the braces into the side panels.
-
Sand everything. Start with 80-grit to smooth rough edges and remove mill marks, then progress to 120 and 220 grit for a finish-ready surface. Pay special attention to the top edges where hands will rest. Wipe away dust with a tack cloth.
-
Prime and paint or stain. Apply a quality primer (especially over pine, which can blotch) before painting. Two coats of satin or semi-gloss paint offer durability and easy cleaning. If staining, use pre-stain wood conditioner on softwoods to prevent uneven absorption. Finish with polyurethane for protection.
-
Attach the lid. Position the 3/4″ plywood lid on top. Mark hinge placement along the back edge, about 6″ in from each end. Predrill screw holes to prevent splitting. Attach hinges to the lid first, then to the back panel or corner braces. Test the hinge swing to ensure it opens fully without binding.
-
Optional upholstery. Cut 2″ foam to match the lid dimensions. Spray adhesive holds it in place. Wrap fabric over the foam, pulling taut and stapling to the underside of the lid with a staple gun. Miter corners like wrapping a present for a clean finish.
Safety notes: Wear safety glasses when cutting and drilling. Use a dust mask or respirator when sanding, especially MDF or plywood (which contains formaldehyde). Keep fingers clear of saw blades, use push sticks for narrow cuts.
Alternatives and upgrades: Add a gas lift strut (available at hardware stores) to make the lid stay open hands-free, essential if the bench will be accessed frequently. Install decorative molding or trim along the base for a furniture-grade look. Swap the plywood lid for solid wood planks for a farmhouse aesthetic.
For more detailed plans and cut lists, communities like Fix This Build That and Instructables offer free downloadable templates with 3D diagrams and material calculators.
Cost and time: Expect to spend 6–8 hours over a weekend, including drying time for glue and finish. Material costs run $75 for basic pine and plywood, up to $150 for hardwood or pre-primed boards. That’s significantly less than retail benches, which start around $150 for particleboard models and climb past $400 for solid wood or upholstered versions.