Table of Contents
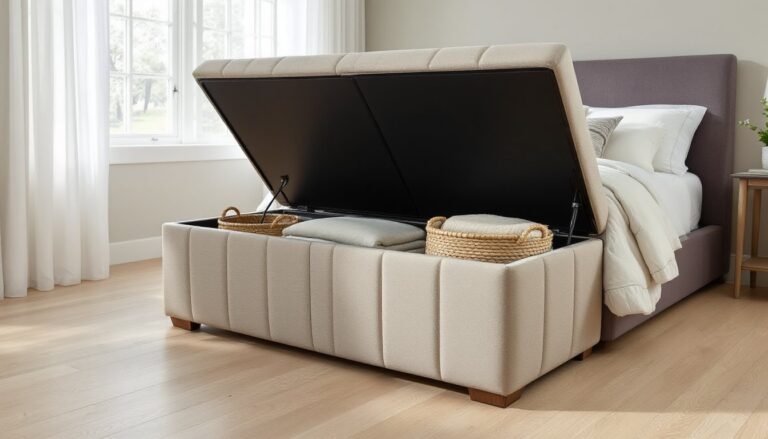
ToggleA built-in bench with storage combines seating, organization, and architectural character in one custom piece. Unlike freestanding furniture that can shift, slide, or leave awkward gaps, a built-in integrates directly into the room’s layout, creating a finished, intentional look while maximizing every square inch. Whether tucked into a breakfast nook, anchoring a mudroom, or flanking a window seat, these benches solve two problems at once: where to sit and where to stash. The project requires intermediate carpentry skills, basic power tools, and careful planning, but the result is a tailored feature that elevates both function and resale value.
Key Takeaways
- A built-in bench with storage combines seating and organization while eliminating wobbling and tipping by anchoring directly into wall studs, making it structurally secure for daily heavy use.
- Built-in storage benches maximize space efficiency in smaller homes by fitting snugly into alcoves, under staircases, or along walls where standalone furniture would leave wasted gaps.
- Entryways and mudrooms are ideal locations for built-in benches, with typical dimensions of 48 to 72 inches wide and 17 to 18 inches in seat height, featuring cubbies or lift-top access for boots, backpacks, and seasonal gear.
- Kitchen nooks and breakfast areas benefit from banquette-style benches that seat more people while maximizing seating in compact spaces, with storage ideal for linens, platters, and items needed nearby but not daily.
- Success depends on accurate measurements at multiple points, anchoring into at least two wall studs with 3-inch construction screws, and checking for obstacles like electrical outlets and vents before cutting materials.
- Cushion selection and upholstery finish the built-in bench’s appearance; for high-traffic areas, outdoor fabric or vinyl is more durable and easier to clean than traditional cotton or linen.
Why Choose a Built-In Storage Bench for Your Home
Built-in benches with storage deliver functionality that standalone furniture can’t match. They’re anchored to wall studs, making them structurally secure enough for heavy daily use, no wobbling or tipping, even when kids climb on them. The storage compartment below replaces bulky bins or baskets, keeping shoes, sports gear, linens, or seasonal items out of sight but within reach.
Space efficiency is the main draw. A built-in can fit snugly into alcoves, under staircases, or along short walls where a standalone bench would leave dead space on either side. Because it’s custom-sized, there’s no wasted width or depth. In smaller homes, this matters. A 48-inch bench with a 15-inch seat depth and 18-inch interior storage cavity can hold more than a comparable store-bought piece while taking up less floor area.
From a design standpoint, built-ins feel permanent and polished. They don’t float in the middle of a room or clash with trim profiles. When built to match existing baseboards, crown molding, or cabinetry, they blend into the architecture. For resale, buyers notice details like integrated seating and storage, especially in high-traffic areas like entryways and kitchens, as signs of a well-maintained, thoughtfully designed home.
The project does require commitment. Unlike a piece you can move or return, a built-in is there to stay. That’s why planning the location, dimensions, and access method (lift-top, drawers, or doors) matters more than with off-the-shelf options.
Best Locations for Built-In Storage Benches
Entryways and Mudrooms
Mudrooms and entryways are the most common, and arguably the best, spots for a built-in storage bench. The bench provides a place to sit while pulling on boots or tying shoes, and the storage below handles the daily chaos of backpacks, cleats, dog leashes, and winter accessories. A typical mudroom bench runs 48 to 72 inches wide, with a seat height of 17 to 18 inches (standard for comfortable sitting) and interior cubbies or lift-top access.
In a mudroom, cubbies work better than a single open compartment. Dividers keep each family member’s gear separated and prevent the interior from becoming a black hole. If building cubbies, aim for 12 to 15 inches wide per person. Add coat hooks or a shelf above the bench for hats and bags.
For entryways without a dedicated mudroom, a shorter bench, 36 to 48 inches, fits along a side wall or under a window. Choose hinged lift-top access if the bench backs up to a wall: it’s easier to open than pulling out drawers in a tight space. Consider adding a cushion for comfort, especially if the bench will see use during morning routines. A 2 to 3-inch foam cushion wrapped in durable fabric like canvas or outdoor upholstery fabric holds up to daily wear.
Kitchen Nooks and Dining Areas
Breakfast nooks and dining areas benefit from built-in benches that tuck under windows or wrap around corner tables. These benches maximize seating in small kitchens where chairs would crowd the walkway. A banquette-style bench built along two walls can seat six people around a table that would normally fit four chairs.
Kitchen benches typically sit at dining height, 18 inches from floor to seat, and extend 12 to 18 inches from the wall, leaving enough room to slide in and out without hitting the table edge. The storage below is ideal for table linens, serving platters, or kid’s craft supplies, items you want nearby but don’t need every day. Many custom-fit banquette plans include flip-up seat access with gas struts to hold the lid open, preventing pinched fingers.
Be mindful of heating vents and electrical outlets when planning a kitchen bench. If the bench sits over a floor register, you’ll need to reroute ductwork or cut a vent grill into the toekick. Outlets near the floor should remain accessible, don’t box them in. If the outlet is above the seat line, plan a hinged panel or removable trim piece for access.
Design Options and Style Ideas
Design choices affect both aesthetics and function. Start with the access method. Lift-top benches offer one large storage cavity accessed by raising the seat. They’re simple to build and maximize interior volume, but they require clearing off the seat before opening. Gas lid supports (available in 50, 80, or 100-pound ratings) hold the lid open and prevent slamming.
Drawer benches provide easier access but cut into interior height. A bench with two or three drawers needs at least 20 inches of total height to accommodate the seat thickness, drawer box depth, and bottom clearance. Full-extension drawer slides (rated for 75 to 100 pounds) allow you to reach items at the back. Drawers work well in kitchens or hallways where you’ll access contents frequently and don’t want to lift cushions.
Door-front benches with cabinet-style doors split the difference. Doors swing open from the front, leaving the top surface undisturbed. This style suits formal spaces like living rooms or dining areas where the bench might hold decorative pillows or a runner. Use concealed European hinges for a clean look or exposed butt hinges if you’re going for a farmhouse or traditional style.
Stylewise, match the bench to existing trim and cabinetry. In a Craftsman-style home, add wide rails and stiles with 1×4 or 1×6 face frames. Shaker-style benches use recessed flat panels and simple lines. For modern or minimalist interiors, skip the face frame entirely and use a flush-front plywood box with edge banding or paint. Beadboard paneling on the sides or front adds cottage charm but increases material and labor time.
Cushions and upholstery finish the look. For a 2-inch foam cushion, wrap high-density foam in batting, then cover with fabric stapled to a ¾-inch plywood base. Add piping or button tufting for detail. If the bench will see heavy use or spills, choose outdoor fabric or vinyl, they’re easier to wipe clean than cotton or linen.
Planning Your Built-In Bench Project
Measuring and Layout Considerations
Accurate measurements prevent costly mistakes. Start by measuring the intended location at multiple points, floors and walls aren’t always level or square. Measure width at the baseboard, at seat height, and at the top. If measurements differ by more than ¼ inch, you’ll need to scribe the bench to fit or shim the base level.
Seat height should be 17 to 18 inches for general seating, or 18 to 19 inches if the bench doubles as dining seating. Seat depth (front to back) typically runs 15 to 18 inches. Anything shallower feels perched: deeper than 20 inches makes it hard to stand up without sliding forward. Measure the depth from the wall to where a seated person’s knees will fall, leave at least 12 inches of clearance between the seat edge and any table or obstacle in front.
Sketch the bench in profile and plan view. Note the location of wall studs (use a stud finder or knock test), electrical outlets, baseboards, and any obstacles like radiators or floor vents. The bench frame needs to anchor into at least two studs using 3-inch construction screws or lag bolts. If studs don’t line up with your layout, add a cleat board (a 2×4 screwed horizontally into the studs) and attach the bench to the cleat.
Materials matter. For the frame, use 2×4 or 2×3 lumber (actual dimensions: 1.5″ x 3.5″ or 1.5″ x 2.5″). The seat and sides typically get ¾-inch plywood, birch or oak veneer if staining, paint-grade fir or MDF if painting. Budget $150 to $300 for materials on a basic 4-foot bench, more if adding drawer slides, hinges, or hardwood trim. Prices vary by region and lumber market conditions, so check local suppliers.
Many free woodworking plans and step-by-step tutorials are available online to guide the build process, but adapt dimensions to your specific space, no two rooms are identical.
Before cutting anything, check local building codes. Built-ins don’t usually require permits unless you’re altering load-bearing walls, relocating electrical, or adding new gas or plumbing lines. If the bench attaches to drywall only (not studs), it won’t support weight safely, always anchor into framing. Use a level, a speed square, and a tape measure you trust. Measure twice, cut once. Most DIY bench failures come from rushed layout or skipped prep, not lack of skill.