Table of Contents
ToggleA cluttered kitchen with nowhere to prep, cook, or store anything is a recipe for frustration. Whether dealing with a small galley layout or a sprawling space that somehow still lacks counter real estate, a kitchen storage island can be the solution. These workhorses combine prep surface, storage capacity, and sometimes seating into one versatile piece. They’re not just trendy, they’re practical additions that can reclaim wasted floor space, organize cookware, and create a natural gathering spot. This guide walks through selecting, sizing, and even building a storage island that fits both the kitchen’s footprint and the homeowner’s needs.
Key Takeaways
- A kitchen storage island combines prep surface, storage capacity, and seating into one versatile piece that reclaims wasted floor space and organizes cookware without requiring a full kitchen remodel.
- Before purchasing or building a kitchen storage island, ensure at least 42 inches of clearance on all sides (48 inches is optimal for multiple cooks) and plan dimensions based on kitchen size: 30×48 inches for small kitchens, 36×72 inches for mid-size spaces, and up to 48×96 inches or larger for spacious layouts.
- Smart storage features like deep drawers with full-extension slides, pull-out shelves, integrated trash bins, and pop-up outlets transform a basic island into a genuinely functional workspace that prevents clutter.
- DIY builders can create a kitchen storage island on a budget through stock cabinet assembly ($300–$800), reclaimed furniture conversion, or built-from-scratch framing using 2×4 studs and plywood ($150–$400 in materials).
- Always hire licensed professionals for electrical, plumbing, or gas work; obtain necessary permits before adding circuits or water lines to comply with NEC code and local building regulations.
What Is a Kitchen Storage Island and Why You Need One
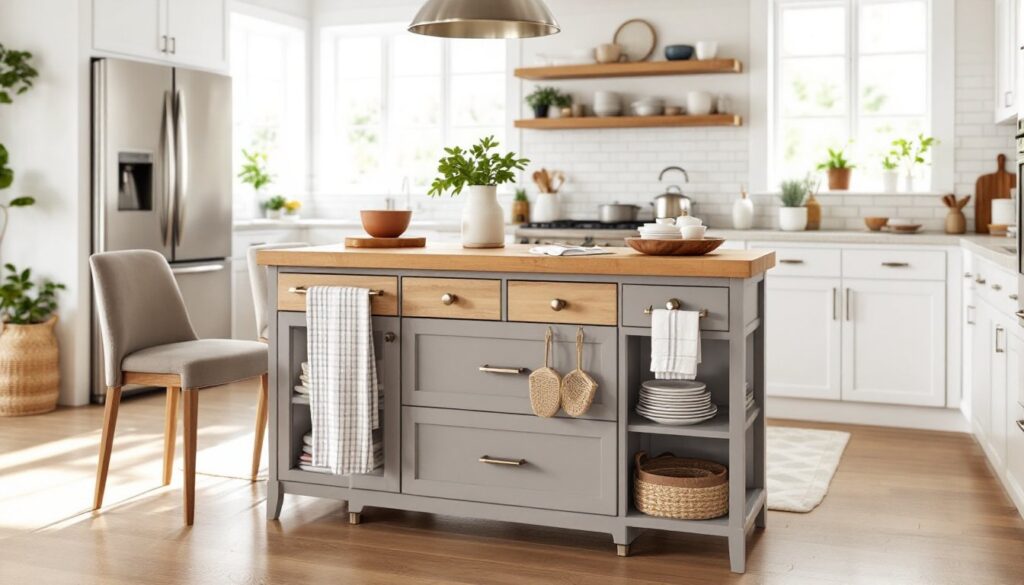
A kitchen storage island is a freestanding or built-in unit that sits in the center of a kitchen, offering countertop workspace on top and storage compartments below. Unlike a simple table or cart, a true island integrates drawers, cabinets, shelves, or a combination of all three.
Why add one? Islands expand functional square footage without a full remodel. They provide a second prep zone during meal prep, house small appliances or pot-and-pan collections, and can double as a breakfast bar with the right overhang and stools. In open-plan homes, an island also defines the kitchen boundary without closing off sightlines.
From a workflow perspective, islands support the classic work triangle (sink, stove, refrigerator) by placing cutting boards, mixing bowls, and utensils within arm’s reach. They also reduce the need to cross back and forth across a galley or L-shaped layout, which cuts down on time, and trips, during cooking.
Be realistic about necessity. If the kitchen has less than 36 inches of clearance on all sides of a proposed island, it won’t meet basic traffic flow standards and will feel cramped. Similarly, structural work like plumbing or electrical for a sink or outlets may require permits and licensed trades.
Types of Kitchen Storage Islands for Every Space
Portable and Rolling Islands
These freestanding units rest on casters or legs and can be moved as needed. Rolling islands work well in rentals or kitchens where layout flexibility matters. Most measure 24 to 36 inches wide and include a butcher-block or stainless-steel top, a couple of drawers, and open shelving or a towel bar.
Pros: No installation. Easy to reposition for gatherings or deep cleaning. Models like those with locking casters stay put during chopping.
Cons: Limited storage compared to built-ins. Countertop surface is usually smaller. Not suitable for mounting a cooktop or sink.
Look for solid construction, particleboard frames wrapped in veneer tend to sag under heavy use. Hardwood frames with dovetail drawer joints hold up better. Also check wheel load ratings: cheaper casters can crack tile or gouge hardwood.
Built-In and Custom Islands
Permanent islands are either site-built by a carpenter or assembled from stock cabinetry. They’re anchored to the floor and can support granite, quartz, or butcher-block countertops in sizes up to 4 by 8 feet or larger.
Built-in islands allow for deep storage, think full-depth 24-inch base cabinets, pull-out trash bins, appliance garages, and even dishwasher or microwave installations. Electrical outlets (required by NEC code if the countertop is longer than 24 inches) and plumbing runs are easier to integrate during construction.
Custom vs. stock: Stock cabinets from big-box retailers come in 3-inch increments and can be combined for a semi-custom look at lower cost. True custom work, built by a cabinetmaker, fits odd dimensions and allows for unique features like curved ends or integrated wine racks, but expect to pay a premium.
Permits are typically required if adding plumbing, gas lines, or new circuits. Check local codes before committing.
Choosing the Right Size and Layout for Your Kitchen
Start with clearance. The International Residential Code (IRC) recommends a minimum of 42 inches between the island and surrounding cabinets or appliances: 48 inches is better if multiple cooks share the space. Measure all four sides before ordering or building anything.
Island dimensions depend on kitchen size and function:
- Small kitchens (under 150 sq ft): A 30-inch by 48-inch rolling or narrow fixed island keeps traffic lanes open.
- Mid-size kitchens (150–250 sq ft): A 36-inch by 72-inch island offers ample prep area and storage without overwhelming the room.
- Large kitchens (250+ sq ft): Islands can stretch to 48 inches by 96 inches or more, accommodating a cooktop, second sink, or bar seating.
Counter height is typically 36 inches for standard prep work. If adding seating on one side, consider a 42-inch bar-height overhang or a two-tier design with a raised section for stools.
Account for door swing and appliance clearances. Refrigerator and dishwasher doors need at least 90 degrees of swing: an island placed too close will block access. Sketch a scaled floor plan on graph paper or use painter’s tape to outline the footprint on the floor before purchasing materials.
Don’t forget vertical space. Hanging pot racks or open shelving above an island can free up base cabinet real estate, but ensure headroom, 72 inches minimum clearance from floor to hanging fixture.
Smart Storage Features to Look For
Not all islands are created equal. Here’s what separates cluttered junk magnets from genuinely useful storage:
- Deep drawers with full-extension slides: These allow access to the back of the drawer without crouching. Look for soft-close mechanisms, they’re worth the extra cost and prevent slammed fingers.
- Pull-out shelves and dividers: Fixed shelves waste space. Pull-outs bring pots, pans, and small appliances into reach. Vertical dividers keep baking sheets and cutting boards upright instead of stacked.
- Open shelving on ends: Great for cookbooks, baskets, or everyday dishes. Keeps frequently used items visible and accessible from multiple sides.
- Towel bars and hooks: Simple add-ons that prevent dish towels from piling up on the counter.
- Integrated trash and recycling: Pull-out bins hide waste and keep odors contained. Standard cabinet widths fit dual 35-quart bins.
- Power strips or pop-up outlets: Built into the countertop or side panel, these allow for mixer, blender, or phone charging without running cords across the floor.
If building from scratch, consider backing one side with beadboard or shiplap and adding hooks for aprons, oven mitts, or hanging utensils. Many kitchen island designs incorporate this detail for both function and farmhouse-style appeal.
Material choice matters. Solid wood shelves support more weight than wire racks. Plywood or MDF carcasses should be at least ½ inch thick to resist sagging under heavy loads. For drawers holding cast iron or stoneware, ¾-inch plywood bottoms are a must.
DIY Kitchen Storage Island Ideas on a Budget
Building a custom island doesn’t require a cabinetmaker’s skill set. Here are three approachable projects:
Option 1: Stock Cabinet Assembly
Purchase two or three stock base cabinets from a home center. Bolt them together back-to-back or side-by-side, add a countertop (butcher block, laminate, or a ¾-inch plywood core with contact cement and edge banding), and finish with trim or baseboard around the base. Total cost: $300–$800 depending on cabinet quality and countertop material.
Tools needed: Drill/driver, level, clamps, circular saw or jigsaw (for countertop cuts). A second pair of hands helps when positioning cabinets.
Option 2: Reclaimed Furniture Conversion
An old dresser, sideboard, or even a solid-core door on a frame can become an island. Strip, sand, and refinish the piece. Swap out drawer pulls for modern hardware. Add locking casters if mobility is desired. Top with a 1½-inch butcher-block slab or tile.
This approach works best for light-duty storage, don’t expect particleboard furniture to support a marble slab or heavy cookware long-term.
Option 3: Built-from-Scratch Frame
For those comfortable with basic framing, building an island from 2×4 studs and ¾-inch plywood is straightforward. Frame a box to desired dimensions, sheath with plywood, add face frames from 1×2 or 1×3 pine, then install inset or overlay cabinet doors and drawer fronts. Prime and paint or stain as desired.
Free plans are available from resources like Fix This Build That and Ana White’s woodworking library, complete with cut lists and step-by-step instructions. Budget roughly $150–$400 in materials, depending on hardware and finish choices.
Critical prep steps:
- Acclimate lumber indoors for 48–72 hours before cutting to prevent warping.
- Use a square and level at every stage. A twisted frame means doors won’t close.
- Pre-drill all screw holes to avoid splitting.
- Finish all surfaces, including interiors, to prevent moisture absorption and odor retention.
Safety: Wear safety glasses when cutting, dust masks when sanding, and hearing protection if using a miter saw or router. Secure workpieces with clamps, never freehand cuts.
If adding electrical, hire a licensed electrician or pull a permit and follow NEC Article 210 for outlet spacing and GFCI protection. Plumbing and gas work should always be handled by licensed professionals unless local codes explicitly allow homeowner work with inspection.