Table of Contents
ToggleCluttered countertops, overflowing cabinets, and that junk drawer that never quite closes, sound familiar? Most kitchens weren’t designed with enough storage for the reality of how we cook and live today. The good news is that the right kitchen storage organizers can reclaim every inch of wasted space without a full-blown remodel. Whether you’re working with a galley apartment kitchen or a sprawling suburban setup, there are practical, affordable ways to bring order to the chaos. This guide walks through the types of organizers worth investing in, how to match them to your specific layout, and even a few DIY builds that’ll save you money.
Key Takeaways
- Kitchen storage organizers maximize space efficiency by using vertical dividers, pull-out trays, and tiered risers that can double or triple cabinet capacity without renovation.
- Measure cabinet interiors carefully before purchasing organizers, as nominal sizes are 2–3 inches narrower than exterior dimensions, ensuring a proper fit.
- Pull-out shelves, lazy Susans, and corner pull-outs address base cabinet dead zones and corner cabinet waste, bringing hard-to-reach items into easy access.
- DIY organizer projects like pull-out spice racks and under-sink sliding shelves cost $15–$40 per project compared to $120+ for retail units, delivering the same function at a fraction of the price.
- Material selection matters: coated wire and solid plastic organizers outperform standard wire in damp environments, while bamboo drawer dividers resist swelling better than particle board.
- Organized kitchens reduce meal prep time and friction while improving resale value and daily livability—making kitchen storage organizers one of the highest-value home upgrades.
Why Kitchen Storage Organizers Are Essential for Modern Homes
The modern kitchen does triple duty as a cooking station, command center, and gathering spot. That means it’s housing not just pots and pans, but also small appliances, snack bins, school forms, charging cables, and whatever else lands on the counter. Without dedicated organizers, things get buried, duplicated, or tossed in frustration.
Efficiency matters. When everything has a home, meal prep moves faster. You’re not digging through a tangle of utensils or knocking over olive oil bottles to find the paprika. Studies from The Kitchn and similar home design resources consistently show that organized kitchens reduce prep time and daily friction.
Space optimization is real estate. Vertical dividers, pull-out trays, and tiered risers can double or triple the usable capacity of a cabinet without adding square footage. That’s especially critical in older homes where cabinet depth and height don’t align with today’s oversized mixing bowls and bulk grocery runs.
Resale value and livability both improve. Buyers notice functional storage during walkthroughs, and you’ll enjoy the space more while you’re living in it. It’s one of the rare upgrades that pays off immediately in daily quality of life.
Top Types of Kitchen Storage Organizers to Consider
Not all organizers are created equal, and what works in one kitchen can be overkill or a bad fit in another. Here’s a breakdown of the most effective categories.
Cabinet and Drawer Organizers
Base cabinets are the worst offenders for wasted space. A standard 36-inch base cabinet is usually around 24 inches deep, and anything past the first 12 inches becomes a black hole. Pull-out drawers or sliding shelves solve this by bringing the back of the cabinet to you. They’re available in wood, coated wire, or heavy-duty polymer, with weight capacities ranging from 75 to 100 pounds for quality models.
Drawer dividers keep utensils, knives, and gadgets from sliding into chaos. Bamboo or molded plastic inserts are inexpensive and customizable. For deeper drawers, consider peg systems (like those inspired by workshop toolboxes) that let you rearrange compartments as needs change.
Lazy Susans and corner pull-outs address the awkward geometry of corner cabinets. A kidney-shaped lazy Susan maximizes access in a blind corner base, while a LeMans or Magic Corner unit (two-tier pull-out with attached shelves) is pricier but uses nearly every cubic inch.
Under-sink organizers have to work around plumbing. Look for U-shaped or tiered racks that fit around the drain trap. If you’re handy, you can build a simple sliding tray from 1/2-inch plywood and full-extension drawer slides rated for at least 75 pounds. Just measure the width between the sink walls and account for the trap’s offset.
Pantry Storage Solutions
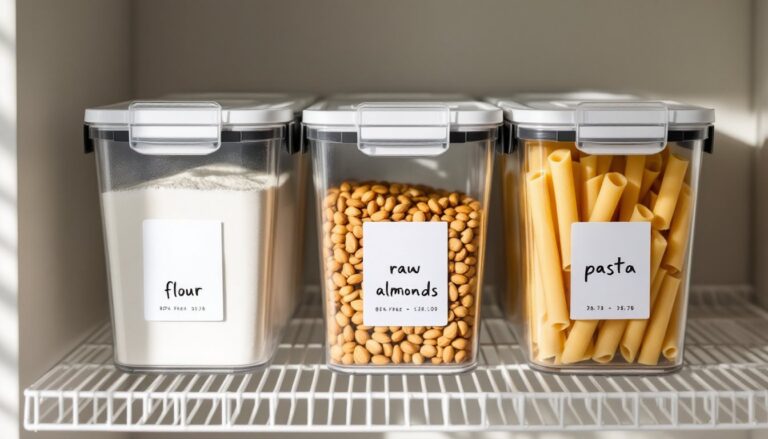
Pantries range from walk-in rooms to a single 18-inch cabinet, so solutions vary widely. Clear, airtight containers (typically made from BPA-free plastic or borosilicate glass) keep dry goods fresh and make inventory visible at a glance. Standardizing on a few container sizes, like 2-quart, 4-quart, and 1-gallon, simplifies stacking and labeling.
Tiered shelf risers or expandable racks add a second level inside deep pantry shelves, preventing cans and jars from getting lost in the back. For narrow cabinets, roll-out cans racks use gravity to feed items forward as you take one.
Door-mounted racks take advantage of the often-ignored back of a pantry door. Wire or plastic racks can hold spices, snack bags, or cleaning supplies. Make sure the door hinges can handle the extra weight, if they’re standard 3.5-inch butt hinges and feel loose, upgrade to a heavier-duty hinge or limit the load.
Walk-in pantries benefit from accessible storage principles: place frequently used items at waist height, reserve upper shelves for rarely used serving platters, and use lower shelves or bins for bulk items. Rollable carts or bins make reconfiguring the space simple as needs shift.
How to Choose the Right Organizers for Your Kitchen Layout
Start by auditing what you own and how you actually use the space. Pull everything out of one cabinet at a time, toss expired or duplicate items, and group what remains by function (baking, breakfast, snacks, etc.). Measure the interior cabinet dimensions, width, depth, and height, before shopping. Nominal cabinet sizes (like “36-inch base”) refer to the exterior face frame: the interior usable space is often 2 to 3 inches narrower.
Galley and small kitchens prioritize vertical storage and multipurpose solutions. Magnetic knife strips, wall-mounted spice racks, and hanging pot racks free up counter and cabinet real estate. Slim pull-out pantries (6 to 12 inches wide) can fit in gaps between appliances or at the end of a cabinet run. Some units are DIY-friendly if you’re comfortable with a drill, a level, and installing full-extension slides.
L-shaped and U-shaped layouts often have corner cabinets that are prime candidates for lazy Susans or corner pull-outs. If you’re renovating and can specify cabinet interiors, corner drawers (diagonal-front drawers that pull straight out) are game-changers but require a cabinet shop to build.
Open-concept kitchens benefit from organizers that double as display. Woven baskets, labeled canisters, and uniform storage bins on open shelving keep things tidy while looking intentional. Avoid mismatched plasticware on open shelves, it reads as clutter, not curated.
Material and finish matter. Wire organizers are affordable and allow airflow, but they can snag bags and aren’t ideal under sinks where moisture is present. Coated wire or solid plastic holds up better in damp environments. For drawer organizers, bamboo resists water better than MDF or particle board and won’t swell if it gets damp.
Installation complexity varies. Drawer inserts drop right in. Pull-out shelves require drilling into the cabinet sidewalls and mounting the slides level, doable with a drill, a square, and patience, but expect an hour per cabinet if it’s your first time. Permanent modifications may affect rental deposits or resale if the organizers look cheap or are installed poorly.
DIY Kitchen Organization Projects That Save Money
Retail organizers can get expensive, but a handful of DIY builds offer the same function at a fraction of the cost. Here are three projects that require only basic tools and modest carpentry skills.
Pull-Out Spice Rack (Narrow Cabinet)
If you have a narrow cabinet (9 to 12 inches wide) next to the range, you can build a vertical pull-out spice rack. You’ll need:
- Two 1×4 pine or poplar boards cut to the interior cabinet height (typically 30 inches for base cabinets)
- 1×3 boards for shelves, cut to the interior width minus 1 inch for slide clearance
- 1×2 trim for shelf lips to prevent bottles from sliding off
- One pair of full-extension drawer slides rated for 75 pounds
- Wood glue, 1.25-inch finish nails or screws, and sandpaper
Assemble a ladder-style frame with the 1×4s as the sides and the 1×3s as shelves spaced 4 to 5 inches apart. Attach 1×2 lips to the front edge of each shelf. Sand and finish with a water-based polyurethane or paint. Mount the slides to the cabinet sidewalls and the back of the frame. Total material cost: around $30 to $40, compared to $120+ for a pre-made unit. Multifunctional storage solutions like this maximize every inch.
Under-Sink Sliding Shelf
Measure the width between the cabinet sides and the height clearance around the plumbing. Cut a piece of 1/2-inch plywood to fit, leaving 1 inch on each side for the drawer slides. Attach slides to the cabinet floor and the underside of the shelf. Add a simple handle or cut a finger pull in the front edge. If there’s vertical space, stack two shelves with a second set of slides. Cost: about $20 in materials. Safety note: Wear a dust mask when cutting plywood: the glues in the laminate can be irritants.
Pegboard Pot Lid Organizer
Cabinet doors are underused real estate. Cut a piece of 1/4-inch pegboard to fit the interior of a door (usually around 12×24 inches). Mount it with 1/2-inch spacers (small wood blocks or specialty pegboard standoffs) so hooks can insert from the front. Use metal pegboard hooks to hang pot lids, measuring cups, or lightweight pans. Attach the pegboard to the door with screws driven into the door frame, not just the thin panel. This keeps lids visible and frees up cabinet space for the pots themselves. Material cost: under $15. For tips on storage cubes and modular systems that pair well with pegboard setups, many DIYers cross-reference guides to find compatible hooks and bins.
Drawer Divider Inserts
If you have a table saw or circular saw, cut strips of 1/4-inch plywood or hardboard to create custom dividers. Measure the drawer interior and plan a grid pattern. Cut vertical dividers to the drawer height (usually 3 to 4 inches for utensil drawers) and horizontal dividers with notches that interlock. No glue or fasteners needed, friction holds them in place, and you can reconfigure as needed. Total cost: about $10 per drawer. The approach mirrors techniques in garage storage where modular dividers adapt to shifting inventories.
Safety Gear
For all cutting and assembly: wear safety glasses, use a dust mask or respirator when sanding or cutting MDF/plywood, and keep fingers clear of saw blades. A hearing protection is smart if you’re using a circular saw or router for more than a few minutes. Most DIY injuries come from rushing or skipping eye protection, don’t be that statistic.
Conclusion
Kitchen storage organizers aren’t about buying more stuff, they’re about making the stuff you already own work harder. Whether you invest in pull-out shelves, retrofit a corner cabinet, or spend a Saturday building a spice rack, the payoff is a kitchen that actually functions the way you cook. Measure carefully, choose materials that’ll hold up to daily use, and don’t skip the safety gear on DIY builds. A little planning now beats years of digging through cluttered cabinets.