Table of Contents
ToggleConverting a shipping container into an office isn’t just trendy, it’s practical, cost-effective, and surprisingly doable for the motivated DIYer. Whether you need a backyard workspace, a remote job headquarters, or a quiet retreat away from household chaos, a container office delivers durability and flexibility that stick-built structures can’t match. The steel frame handles weather extremes, the footprint fits tight lots, and the construction timeline beats traditional builds by months. But before you order a container and start swinging a Sawzall, you’ll need to understand sizing, permitting, climate control, and interior layout. This guide walks through the planning, modifications, and finishing touches to turn a steel box into a functional, comfortable workspace.
Key Takeaways
- A storage container office costs $1,500–$5,000 for the container itself, saving significantly compared to traditional sheds ($8,000–$15,000) while reducing construction timelines to 4–8 weeks.
- Proper insulation using closed-cell spray foam (2–3 inches) or framed walls with fiberglass is essential to prevent condensation and maintain comfortable temperatures in the steel structure.
- Site preparation requires a level, stable foundation such as concrete piers or a reinforced slab, with attention to local frost line depths and strict leveling within 1/4 inch over 10 feet.
- Electrical and HVAC installations must comply with the National Electrical Code and local building codes; hire licensed professionals for service connections, subpanels, and mini-split heat pumps to ensure safety and code compliance.
- Strategic interior design—including white or light-colored walls, natural windows on opposite sides, LED lighting at 50–75 foot-candles, and wall-mounted storage—transforms a container office into a functional, pleasant workspace.
What Is a Storage Container Office and Why Choose One?
A storage container office is a repurposed shipping container, typically 20 or 40 feet long, modified with insulation, windows, doors, electrical, and HVAC to create a standalone workspace. These containers are built from 14-gauge corrugated steel with a marine-grade coating, designed to survive ocean voyages stacked nine high. That translates to serious structural strength and weather resistance.
Why choose a container over a traditional shed or site-built office? Speed and cost top the list. A new 20-foot container runs $3,000–$5,000, while a used one in decent shape costs $1,500–$3,000. Compare that to a custom 160-square-foot shed at $8,000–$15,000 (materials and labor), and the savings add up. Construction time shrinks, too, most DIY container office projects wrap up in 4–8 weeks versus months for conventional builds.
Containers also offer modularity. Need more space later? Add a second container. Want to relocate? Hire a flatbed and take your office with you. The steel frame handles modifications well, cutting window openings, welding door frames, and mounting interior framing are all straightforward with the right tools.
That said, container offices aren’t for everyone. You’ll need a level foundation (concrete piers or a slab), local zoning approval (many jurisdictions classify them as accessory structures), and possibly electrical and building permits depending on your modifications. If your municipality restricts shipping containers or requires setbacks you can’t meet, this project won’t fly. Check with your local building department before you buy.
Planning Your Storage Container Office Project
Start by defining your needs: desk space, storage, meeting area, or a combo? Then map that to a container size and layout. You’ll also need to secure permits, prep your site, and arrange delivery.
Permits and codes: Most areas require a building permit for any structure with electrical or plumbing. Even if you’re not running water, installing a subpanel counts. The International Residential Code (IRC) and National Electrical Code (NEC) set baseline standards, but local amendments vary. Expect inspections for foundation, framing, electrical rough-in, and final. Some jurisdictions also require engineered foundation plans if you’re using a slab.
Site prep: Containers need a flat, stable base. A gravel pad with concrete piers (minimum 12×12 inches, 24 inches deep) at each corner and midpoints works for most climates. In frost zones, piers must extend below the frost line, check your local depth. A 4-inch reinforced concrete slab offers the most stability and simplifies interior flooring, but costs $800–$1,500 for a 20-foot container footprint. Ensure the pad is level within 1/4 inch over 10 feet: containers sit on corner castings, and a tilted frame complicates door installation and interior finishing.
Delivery logistics: Shipping containers arrive on flatbed trucks or tilt-bed trailers. You’ll need 14 feet of overhead clearance and a clear path at least 10 feet wide. Tight driveways, low-hanging power lines, or soft soil can block delivery. Coordinate with the driver, most will set the container with a crane or tilt the bed if space allows, but you may need to hire a crane service separately ($300–$600).
Choosing the Right Container Size and Type
20-foot containers measure 20 feet long × 8 feet wide × 8.5 feet high (external). Interior dimensions are roughly 19’4″ × 7’8″ × 7’10”, giving you about 152 square feet of floor space. That’s enough for a desk, small seating area, and wall-mounted storage. Weight runs around 5,000 pounds, so a DIY foundation is manageable.
40-foot containers double the length (40 feet long × 8 feet wide × 8.5 feet high) for about 304 square feet inside. If you’re planning a larger workspace, meeting zone, or multiple workstations, the extra footage justifies the higher cost ($4,500–$7,000 new, $2,500–$4,500 used). Some suppliers offer 40-foot high-cube containers at 9.5 feet tall, gaining nearly a foot of headroom, worth it if you’re tall or want a less claustrophobic feel.
One-trip vs. used: One-trip (or “new”) containers made one voyage from the factory and show minimal wear, clean floors, no major dents, fresh paint. Used containers (often called “cargo-worthy” or “wind and water tight”) may have dings, surface rust, and patched floors, but structurally they’re sound. For an office, one-trip makes sense if you’re cutting windows and want clean steel. Used is fine if you’re on a budget and don’t mind cosmetic flaws.
Standard vs. high-cube: High-cube containers add 12 inches of height, which feels significant inside. If your ceiling plan includes recessed lights, a drop ceiling, or thick insulation, high-cube prevents a cramped vibe. Standard height works for minimal overhead and surface-mount fixtures.
Before you buy, inspect the container in person if possible. Check corner posts and roof panels for rust-through, verify door seals close tight, and confirm the floor isn’t rotted (plywood floors degrade faster than bamboo or steel).
Essential Modifications and Installations
Turning raw steel into a livable workspace requires cutting openings, insulating, running power, and controlling temperature. Tackle these in order: framing and insulation first, then electrical, then HVAC.
Cutting window and door openings: Mark your layout with chalk, then cut with a plasma cutter (cleanest), angle grinder with a cutoff wheel (slower but accessible), or reciprocating saw with a metal blade (doable but sparks everywhere). Wear a full-face shield, welding gloves, long sleeves, and ear protection, cutting corrugated steel throws hot metal chips and noise above 100 dB. Frame openings with 2×4 or 2×6 steel tubing welded to the container walls to maintain structural integrity. If you’re not confident welding, hire a mobile welder ($200–$400 for window and door frames). Once framed, install RO (rough opening) windows, vinyl or aluminum sliders in standard sizes (24×36, 30×48) cost $100–$300 each. Use exterior-grade sealant (polyurethane or butyl tape) around flanges to prevent leaks.
Doors: A standard 36-inch pre-hung exterior door fits most office needs. You can keep the container’s cargo doors for ventilation or secondary access, but they’re not insulated and seal poorly. Some builders cut them off entirely and weld in a steel frame for a traditional entry door. Others leave them intact and install a man door on the side wall.
Insulation, Climate Control, and Electrical Setup
Insulation: Metal containers sweat in humidity and radiate heat in summer, cold in winter. Proper insulation is non-negotiable. Closed-cell spray foam (2–3 inches, R-13 to R-20) is the gold standard, it seals tight, adds rigidity, and prevents condensation. Professional application runs $1.50–$3.00 per square foot (about $800–$1,500 for a 20-foot container). DIY spray foam kits exist (Froth-Pak, Touch ‘n Seal) but require careful mixing and PPE: respirator, goggles, and Tyvek suit, the chemicals are nasty.
Alternatively, frame interior walls with 2×3 or 2×4 studs 16 inches on center, fill cavities with fiberglass batts (R-13 or R-15), and sheath with 1/2-inch drywall or plywood. This approach costs less ($400–$800 materials) and lets you run electrical in the wall cavities, but you lose 3–4 inches of width on each side. Add a vapor barrier (6-mil polyethylene) on the warm side of the insulation to prevent moisture buildup.
Electrical: Running power to your office means either trenching UF-B (underground feeder) cable from your main panel or installing a separate subpanel if the office is over 100 feet away. The NEC requires UF-B buried at least 24 inches deep (or 18 inches if in conduit). Hire a licensed electrician for the service connection and subpanel install, this isn’t a DIY-friendly task, and inspectors scrutinize it. Budget $800–$1,500 for a 100-amp subpanel and trench run.
Inside the container, surface-mount conduit (EMT or rigid PVC) keeps wiring accessible and code-compliant. Plan for four to six outlets, overhead lighting (LED shop lights or recessed cans if you have headroom), and dedicated circuits for HVAC and any equipment. A GFCI-protected outlet is required if you’re within 6 feet of a sink (if you add one later).
HVAC: A mini-split heat pump (9,000–12,000 BTU) handles heating and cooling efficiently in a small, insulated space. Expect to pay $600–$1,200 for a DIY unit (Mr. Cool, Pioneer) or $1,500–$2,500 installed by an HVAC tech. Mount the indoor head unit on an interior wall opposite the workspace for even airflow: the outdoor condenser sits on a pad outside. Mini-splits require a 3-inch line set (refrigerant and drain) run through the wall, seal the penetration with foam and exterior caulk.
For milder climates, a wall-mounted electric heater (Cadet, King) and a window AC unit can suffice, though energy costs run higher. Avoid propane or kerosene heaters, enclosed metal spaces need clean, safe heat sources.
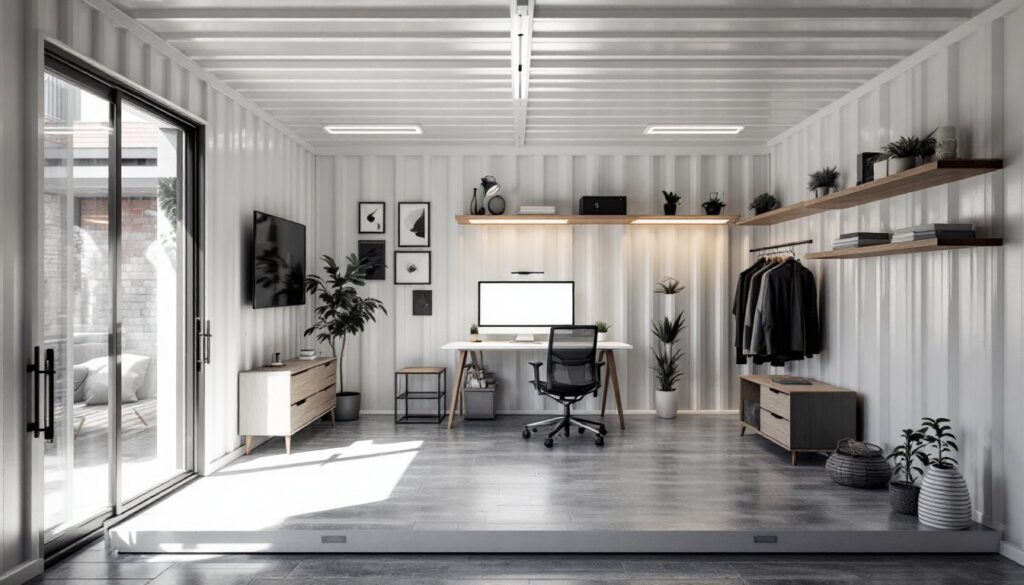
Interior Design Ideas for Your Container Office
With structure and systems sorted, focus on making the space functional and pleasant. Container interiors reward smart layout and light-reflective finishes.
Flooring: The factory plywood floor in most containers is treated with formaldehyde-based pesticides, not ideal for long-term indoor use. Cover it with 3/4-inch plywood subflooring screwed down every 12 inches, then finish with luxury vinyl plank (LVP), laminate, or sealed concrete if you poured a slab. LVP installs fast (click-lock, no adhesive), resists moisture, and costs $2–$4 per square foot. For a 20-foot container, budget $300–$600 for flooring materials.
Walls and ceiling: Paint or panel the walls to brighten the space and hide insulation. White or light gray paint (Behr Ultra, Sherwin-Williams ProClassic) bounces light and opens up the narrow footprint. Alternatively, 1/4-inch plywood or shiplap adds texture and covers imperfections. Some DIYers leave sections of corrugated steel exposed for an industrial look, just prime and paint with rust-inhibiting metal paint (Rust-Oleum or Tremclad).
For the ceiling, tongue-and-groove pine or cedar boards create a warm, finished look and hide spray foam or batt insulation. Run boards perpendicular to the container’s length to visually widen the space. If headroom is tight, skip the drop ceiling and surface-mount LED strip lights or track lighting.
Workspace layout: In a 20-foot container, position your desk along one long wall to maximize floor space. Wall-mounted shelves and pegboards keep gear off the desk. Storage cubes work well for organizing files, supplies, and personal items without eating floor space. In a 40-foot container, you can carve out zones, desk area, seating nook, and storage closet, with partial walls or open shelving as dividers.
Windows and light: Natural light transforms a metal box. Install at least two windows on opposite walls for cross-ventilation and daylighting. South-facing windows (in the Northern Hemisphere) bring the most consistent light: north-facing windows offer softer, indirect illumination. Add cellular or roller shades to control glare and heat gain.
If privacy or lot orientation limits windows, supplement with daylight-spectrum LED bulbs (5000K–6500K) in ceiling fixtures and task lamps. Aim for 50–75 foot-candles of light at desk height for comfortable office work.
Décor and finishing touches: Container offices lend themselves to modern, minimalist aesthetics, but you can soften the industrial edge with wood accents, plants, and textiles. A 5×7 area rug defines the workspace and dampens echo (steel walls reflect sound). Potted plants (pothos, snake plant, ZZ plant) tolerate office conditions and improve air quality. For inspiration on creative container conversions, this DIY shipping container office showcases clever IKEA hacks that maximize tight quarters.
Storage and organization: Built-in desks and shelving make the most of limited square footage. A floating desk mounted to the wall with heavy-duty brackets (rated for 200+ pounds) keeps the floor clear. Overhead cabinets (recycled kitchen uppers work great) store less-used items. If you’re planning a hybrid setup, office and workshop, consider adding a section of slatwall or storage container home plans for ideas on multi-functional layouts. For smaller items and accessories, browse Home Depot storage options that fit narrow shelves and corners.
Tech and connectivity: Run Cat6 Ethernet during the electrical phase for reliable internet. Wi-Fi works, but wired connections beat wireless for video calls and large file transfers. Install a surge-protected power strip at desk level and USB outlets in the wall for phone and tablet charging. If you’re off-grid or semi-remote, a dedicated UPS (uninterruptible power supply) protects gear during outages.
Conclusion
Building a storage container office blends carpentry, electrical work, and creative problem-solving into a project that delivers real value. With the right planning, permits secured, foundation level, insulation tight, and electrical up to code, you’ll end up with a durable, weather-tight workspace that outlasts most stick-built sheds. Take your time on the modifications, don’t skip PPE, and call in pros for the tasks that matter (foundation engineering, electrical service, HVAC install). The result is a modern, functional office that proves shipping containers aren’t just for cargo anymore.